Category Archives: Programming

Certificate-based Mozilla Persona IdP

My name is David Margrave, I am a guest author on unmitigatedrisk.com.  I have worked in the security sphere for 20 years at various U.S. federal agencies, financial institutions, and retailers.  My interests include improving the state of client authentication on the Internet, which is an area that saw robust developments in the 1990s, then languished for a number of years as the Internet at large seemed content with reusable passwords and form-based authentication over SSL/TLS, but has received renewed scrutiny because of recent large scale data breaches and the veiled promise from the Federal government to ‘fix this mess or we will fix it for you’.


The Mozilla Persona project is a recent initiative to improve and standardize browser-based authentication.  For a long time (over 10 years) the most widely-used form of browser-based authentication has been based on HTML forms.  At its most basic level, a user will enter an identifier and reusable password into an HTML form, and submit the form in an HTTPS request to access a protected resource.  The server will receive these values, validate them, and typically return state information in an encrypted and encoded HTTP cookie.  Subsequent visits to the protected resource will send the cookie in the HTTP request, and the server will decrypt and validate the cookie before returning the protected content.   This entire exchange usually takes place over HTTPS, but in many instances the authentication cookie is used over an HTTP connection after initial authentication has completed successfully.  There are other forms of HTTP authentication and other previous attempts at standardization, but a quick survey of the largest retailers and financial institutions will show that HTML form-based authentication is still the most common by far.


Assuming that the implementers of these cookie schemes are competent amateur cryptographers and avoided the most glaring mistakes (see this paper by MIT researchers), all of these authentication schemes which rely on HTTP cookies suffer from the same critical flaw:  An attacker who obtains the cookie value can impersonate the user.  The crucial problem is that HTML form-based authentication schemes have not been capable of managing cryptographic keying material on the client side.  More secure schemes such as Kerberos V5 use a ticket in conjunction with an accompanying session key, both of which are stored in a credentials cache.  In contrast to flawed cookie-based schemes, in the Kerberos V5 protocol, a service ticket is useless to an adversary without the accompanying service ticket session key.  An authentication exchange in Kerberos V5 includes the service ticket, and a value encrypted with the service ticket session key, to prove possession.There are some proprietary or enterprise-level solutions to this situation.  For example, Microsoft Internet Explorer and IIS have long had (for over 10 years) the capability to use HTTP Negotiate authentication and to use GSS-API with Kerberos V5 as the underlying mechanism.  The Apache web server has had the capability to accept HTTP Negotiate authentication for several years as well, but the adoption of these solutions on the Internet at large has not been widespread.  At a high level, the Mozilla Persona project improves this situation by bringing the credentials cache and cryptographic capabilities into the browser, and doing so in a standardized manner.  Although the underlying cryptographic algorithms may differ from the Kerberos V5 example, the importance of this project can’t be understated.


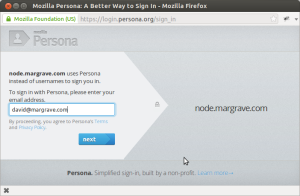
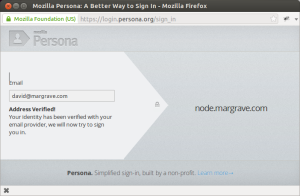
Persona introduces the concept of the Identity Data Provider (IdP).  The basic idea is that a domain owner is responsible for vouching for the identity of email addresses in that domain.  This could involve whatever scheme the domain owner wishes to implement.  If a domain does not implement an IdP, the Persona system will use its own default IdP which uses the email verification scheme that all Internet users are familiar with:  you prove your ability to receive email at a particular address.  When signing-in to a website which uses Persona authentication, the user will be presented with a dialog window asking for the email address to use.

Screenshot from 2013-04-10 13:14:26

Behind the scenes, the Persona system determines which IdP to use to verify the address.  A domain implementing an IdP must publish some metadata (the public key, and provisioning and verification URLs), in JSON format, at the URL https://domain/.well-known/browserid.  The server at the URL must have a certificate from a trusted certificate authority, and the returned value must be properly-formatted JSON with certain required metadata information (described here).


The author implemented an IdP at the domain margrave.com as a research exercise, borrowing from the NodeJS browserid-certifier project.  This particular IdP was written to accept X.509 client certificates issued by a commercial certificate authority, to extract the email address from the X.509 certificate, and issue a persona certificate with that email address. The .well-known/browserid file for node.margrave.com is shown here:

{
    "public-key": {"algorithm":"DS",
        "y":"aab45377fa024964a6b3339d107b91887adf85b96649b5b447a7ac7390866c92d88ed101f6525e717c0d703d5fd8727e0d1d8adb60bb80c7123730616c197326f1eed326fdfc136d7594ffce39a05005a433add8d3344813ea89f6e426d8f5b0bc0d3fdb59c8ec7c19583ba7f14d3636713b84c1ebe62a6866e9c2091def5c25aba967670eabc4591ee3f536006ce5c550265d4b2264c5a989abf908763b41014f35eb2949a0b027a1a1054203a3e13eeb1f16ffb171d6942405546a8407c3fb7e73227e432d150834054edc379de8f8988a8e3b102b70fe5b1164a28a4a453310313e00de1aa177f5ac2b73ef31670e16914607ba4196c06e57f7e5209bc7e4",
        "p":"d6c4e5045697756c7a312d02c2289c25d40f9954261f7b5876214b6df109c738b76226b199bb7e33f8fc7ac1dcc316e1e7c78973951bfc6ff2e00cc987cd76fcfb0b8c0096b0b460fffac960ca4136c28f4bfb580de47cf7e7934c3985e3b3d943b77f06ef2af3ac3494fc3c6fc49810a63853862a02bb1c824a01b7fc688e4028527a58ad58c9d512922660db5d505bc263af293bc93bcd6d885a157579d7f52952236dd9d06a4fc3bc2247d21f1a70f5848eb0176513537c983f5a36737f01f82b44546e8e7f0fabc457e3de1d9c5dba96965b10a2a0580b0ad0f88179e10066107fb74314a07e6745863bc797b7002ebec0b000a98eb697414709ac17b401",
        "q":"b1e370f6472c8754ccd75e99666ec8ef1fd748b748bbbc08503d82ce8055ab3b",
        "g":"9a8269ab2e3b733a5242179d8f8ddb17ff93297d9eab00376db211a22b19c854dfa80166df2132cbc51fb224b0904abb22da2c7b7850f782124cb575b116f41ea7c4fc75b1d77525204cd7c23a15999004c23cdeb72359ee74e886a1dde7855ae05fe847447d0a68059002c3819a75dc7dcbb30e39efac36e07e2c404b7ca98b263b25fa314ba93c0625718bd489cea6d04ba4b0b7f156eeb4c56c44b50e4fb5bce9d7ae0d55b379225feb0214a04bed72f33e0664d290e7c840df3e2abb5e48189fa4e90646f1867db289c6560476799f7be8420a6dc01d078de437f280fff2d7ddf1248d56e1a54b933a41629d6c252983c58795105802d30d7bcd819cf6ef"
    },
    "authentication": "/persona/sign_in.html",
    "provisioning": "/persona/provision.html"
}


The public key from the browserid file is the public portion of the key pair used by the IdP to certify users in the domain.  The fact that it must be served over a URL protected with a certificate issued from a trusted CA, is how the Persona system builds on the existing trust infrastructure of the Internet, instead of attempting to re-implement their own from scratch, or requiring operators of websites relying on Persona authentication to establish shared secrets out-of-band.  The authentication and provisioning URLs are how browsers interact with the IdP.


In the Certificate-based IdP implemented at margrave.com, the page located at /persona/provision.html includes some javascript which does the following things:  calls an AJAX API to get the email address from the certificate, receives the email address that the user entered in the Persona login dialog via a javascript callback, validates that they match, and calls another AJAX API to issue the certificate.  Note that the email address comparison performed in client-side javascript is purely for UI and troubleshooting purposes, the actual issuance of the Persona certificate uses the email address from the X.509 certificate (if the provisioning process progresses to that point), irrespective of what username was entered in the Persona login dialog.  The client-side validation of the email address is to provide the ability to troubleshoot scenarios where a user may choose the wrong certificate from the browser certificate dialog box, etc.  The client-side provisioning source code is shown below (ancillary AJAX error handling code is omitted).


function provision() {

  // Get the email from the cert by visiting a URL that requires client cert auth and returns our cert's email in a json response.
  // This is not strictly necessary, since the server will only issue persona certificates for the email address from the X.509 certificate,
  // but it is useful for troubleshooting, helping the user avoid choosing the wrong certificate from the browser dialog, etc.
  getEmailFromCert(function(emailFromCert) {
      if (emailFromCert) {
          navigator.id.beginProvisioning(function(emailFromPersona, certDuration) {
              if (emailFromPersona===emailFromCert) {
                  navigator.id.genKeyPair(function(publicKey) {
                      // generateServerSide makes an AJAX call to a URL that also requires client cert auth
                      generateServerSide(publicKey, certDuration, function (certificate) {
                          if (navigator.id && navigator.id.registerCertificate) {
                              //alert('registering certificate: ' + certificate);
                              navigator.id.registerCertificate(certificate);
                          }
                      });
                  });
              } else {
                  navigator.id.raiseProvisioningFailure('user is not authenticated as target user');
              }
          });
      } else {
          navigator.id.raiseProvisioningFailure('user does not have a valid X.509 certificate');
      }
  });
}

function generateServerSide(pubkey, duration, cb) {
    $.ajax({
        // Note that this URL requires SSL client certificate authentication,
        // and performs its own authorization on the email address from the certificate,
        // (for example, based on issuing CA or email address domain),
        // and so does not need the email address as an explicit input parameter
        url: "https://node.margrave.com/cert_key",
        type: "POST",
        global: false,
        data: {pubkey: pubkey,
               duration: duration},
               dataType: "json",
        success: function(response) {
                if (response.success && response.certificate) {
                    cb(response.certificate);
                }
            }
    });
    return false;
}

function getEmailFromCert(cb) {
        $.ajax({
            // Note that this URL requires SSL client certificate authentication,
            // and performs its own authorization on the email address from the certificate.
            url: "https://node.margrave.com/email",
            type: "POST",
            global: false,
            dataType: "json",
            success: function(response) {
                cb(response.email);
            }
        });}


The other portion of a Persona IdP, the authentication URL, turned out not to be necessary in this case, because the authentication is implicit in the use of X.509 client certificate-authenticated AJAX calls.  Once the Persona certificate has been provisioned, the user is able to access the protected resource.  If things don’t work as expected, the error messages do not seem to bubble up to the UI dialog, and I had to resort to tracing XHR calls with Firebug to determine what went wrong.  In one case, it was a clock skew error that was corrected by installing ntpd on my IdP server.   In another case, one of my IdP AJAX calls may return an error but this error gets masked by a vague UI message.  It may be helpful to standardize HTTP return code and JSON field names to return descriptive error text to the Persona UI.


Screenshot from 2013-04-10 13:15:32


In its current form, this concept could be useful for enterprises, but not really for the Internet at large, since it requires a) that you have a client cert and b) that the IDP for your email domain is certificate-aware.  However, If the persona-default IDP were certificate-aware, or CAs were persona-aware, then there are some interesting possibilities.

  1. The persona default IDP could skip the verification email if a trusted X.509 client certificate is provided.   Possession of a certificate from a trusted CA implies the email address has already been verified, at a minimum.  The Persona system already accepts CA’s trust when retrieving .well-known/browserid, this idea extends CA trust to clients.
  2. Going the other direction: If a CA were to accept a persona certificate from either a domain’s IDP or from the persona-default IDP, and using that to issue X.509 client certificates, or as one part of the client certificate enrollment process (higher assurance certificates may verify more information than email, such as state-issued identification).  This idea seems promising because the email verification scheme is the wheel that everyone on the Internet has reimplemented, in many cases with security flaws.


Advanced Troubleshooting of Certificate Validation Related Problems on Windows Part 2

One of the most complicated things to troubleshoot in X.509 is failures related to Name Constraints handling, there are a few ways to approach this but one of the easiest is to use the Extended Error Information in the Certificate viewer.

Lets walk through an exercise so you can try using this on your own, first download this script, if you extract its contents and run makepki.bat you get a multi-level PKI that looks something like this:

clip_image002

Before we begin its useful to understand that Name Constraints are applied at an Issuing CA level, in this case the constraints say that the CA is authoritative for any DNS or RFC822 name within in the example.com domain, it also allows a specific base distinguished name (DN).

In our example these constraints are applied by the “Test Partner CA” on to the “Customer CA”; you can see the restrictions in its certificate:

clip_image003

This script creates two certificates, one for email (user.cer) and another for SSL (www.cer), normally the script makes both of these certificates fall within the example.com domain space but for the purpose of this post I have modified the openssl.cfg to put the email certificate in the acme.com domain. — The idea here is that since this domain is not included in the constraints a RFC 3280 compliant chain engine will reject it and we have an error to diagnose.

Normally we don’t already know what the failure associated with a certificate chain is, after all that’s why we are debugging it but the process we use here will help us figure out the answer — applications are notorious for sharing why a certificate chain was rejected.

Since we can’t rely on the applications one way for us to figure this out on our own is to look at the chain outside of the application in the Windows Certificate viewer to see if we can tell what the issue is there.

Let’s start by looking at the “good” certificate:

clip_image005

What’s important here is that we see no errors, but how do we know that? Well let’s look at the bad certificate and see what the difference is:

clip_image007

The certificate clearly has a problem and Windows has done a decent job of telling us what the problem was, there is a name in this certificate that is inconsistent with the Name Constraints associated with this certificate chain. The question is — which name?

To answer that question we need to look at the Name Constraints, remember that this is in the CA certificates it can be in any or all of them which means we need to first figure out where the Constraints are.

To do that we start at the “Certification Path”, here you see something like this:

clip_image008

Notice the little yellow flag, that’s the certificate viewer saying this is where the problem is, let’s take a look at that certificate:

clip_image009

But wait! There isn’t a problem with this one, that’s because this certificate is actually good it’s the certificate it issued that is the problem. Here is the non-obvious part, let’s look at the details tab:

clip_image010

Here we see Windows is telling us exactly what the problem was with the certificate that this CA has issued, it is the email address and its inclusion of the acme.com domain.

Remember that it was restricted, via the Name Constraints extension, to the example.com domain when issuing email certificates. The chain engine would be non-compliant with the associated RFC if it trusted this certificate.

But why did we see this Extended Error Information in this certificate and not the leaf itself? This is actually by design and makes sense when you think about it. Name Constraints can exist in each issuing CA certificate in the chain and what is happening here is that CryptoAPI is telling us that the issuer certificate that was flagged is the offending actor.

This Extended Error Information is available in the Certificate Viewer in a number of cases (for example Revocation), though most of the interesting cases require the application to launch the certificate viewer as you get to view the certificate chain (and all of the associated state) that they were using when they encountered the problem.

Advanced Troubleshooting of Certificate Validation Related Problems on Windows Part 1

The Windows platform for validating X.509 certificates has a feature I don’t see many discuss — its robust logging subsystem.

This allows a non-developer (and developers) to get insights into what is happening with applications interactions with CryptoAPI 2 and to some degree what is happening inside those APIs.

To use this feature you must first enable it, the easiest way to do that is via the EventViewer Management Console (eventvwr.msc), once in there you must navigate to the CryptoAPI 2 (CAPI2) node of the viewer:

clip_image001[6] clip_image002[6] clip_image003[6]


Once you get there you select Properties on the operational log, which will give you a dialog that looks something like this:

clip_image007


Once you “Enable Logging” and “Apply” the changes, immediately all calls to CryptoAPI will be logged. CryptoAPI is used all the time so by the time you close that dialog you will have some events you can look at:

clip_image008


The high level view of each event doesn’t tell you much, for example in the above picture we really only know that the action that was being performed with a “Build Chain”, this particular event corresponds to a call to CertGetCertificateChain.

To really understand what is going on you need to look at the Details tab:

clip_image009


Here we can see what was passed into a given into that API call, we can see what certificates we passed in by the calling application, what settings they chose when making that call:

clip_image011


Some other things you can see in this particular API call include what the disposition of the call was and of course what certificate chain was built.

Every major API in CryptoAPI has logging similar to this, you get to see what is passed in and what came out. Additionally major “objects” are sometimes logged as well, for example here is an event showing a certificate that CryptoAPI was operating against:

clip_image012


Another very useful API to be able to look at is CertVerifyRevocation, this will be logged in this fashion:

clip_image013


Some of these events include references to temporary files, for example in this case you see:

clip_image014

This is a CRL for the “GlobalSign PersonalSign 1 CA – G2”, its stored in the Time Valid Object Cahce (TvoCache), you can look at this cache with the “certutil –urlcache” command.


The events will all tell you which application was the caller and if they are part of a sequence of tasks you get enough information to correlate them and put them in order.

clip_image015


I won’t go through all of the events but as you can see this is super valuable when trying to figure out – Why did that application do that?!

As you might imagine this logging can slow things down and produces a bunch of data so be sure to turn it off when you are done.

RESTful X509, CRL and OCSP to JSON web-service

So the other day I got a bee in my bonnet and decided I wanted a simple web service I could pass common day X509 objects to and get a JSON representation of that same object. We had recently done a project in Go at work and we found it quick, robust and easy to build, additionally it looks it’s certificate support decent enough so I thought it was the way to go.

In comes Freelancer, I threw my rough (and that’s kind) goals in a paragraph or two and a few days later I had a bid proposal from an engineer in Chicago — Eli Frey.

Based on a quick review of the Go documentation for cryptography it looked like this was going to be pretty straight forward, and for the most part it was – we did find that there were a few cases that just were not possible without more work than we wanted to put in, I will summarize those a little later.

As things progressed we also decided to add the ability to get an X509 certificate from the interface. Normally one would do this by generating a PKCS #10 request (CSR) and sending it to a CA for processing, unfortunately one of those cases that required more work than we wanted to put in was parsing PKCS #10s since go does not as of yet support it. With that said a CSR is really just a self-signed certificate we just did the same thing with a self-signed X509 certificate request.

So how do these interfaces work? Here are a few examples of how you would call them:


Decode a PEM encoded X509 certificate
curl  -F “[email protected]” “api.x509labs.com/v1/x509/certificate?action=decode&inputEncoding=PEM”
 
Decode a DER encoded X509 certificate
curl –fail -F “[email protected]” “api.x509labs.com/v1/x509/certificate?action=decode&inputEncoding=DER”
 
Request and issue an X509 certificate based on a DER encoded self-signed certificate with one hostname
openssl genrsa -out request.key 2048
openssl req -config openssl.cfg -subj “/CN=www.example.com” -new -x509 -set_serial 01 -days 1 -key request.key -out request.cer
curl –fail -F “[email protected]” “api.x509labs.com/v1/x509/certificate?action=issue&hostnames=bob.com&inputEncoding=DER”
 
Request and issue an X509 certificate based on a PEM encoded self-signed certificate with one hostname
openssl genrsa -out request.key 2048
openssl req -config openssl.cfg -subj “/CN=www.example.com” -new -x509 -set_serial 01 -days 1 -key request.key -out request.cer
curl –fail -F “[email protected]” “api.x509labs.com/v1/x509/certificate?action=issue&hostnames=bob.com&inputEncoding=PEM”
 
Request and issue an X509 certificate based on a PEM encoded self-signed certificate with several hostnames
openssl genrsa -out request.key 2048
openssl req -config openssl.cfg -subj “/CN=www.example.com” -new -x509 -set_serial 01 -days 1 -key request.key -out request.cer
curl –fail -F “[email protected]” “api.x509labs.com/v1/x509/certificate?action=issue&hostnames=bob.com,fred.com&inputEncoding=PEM”
 
Decode a set of PEM encoded X509 certificates
curl –fail -F “[email protected]” “api.x509labs.com/v1/x509/certificates?action=decode&inputEncoding=PEM”
 
Decode a PEM encoded X509 crl
curl –fail -F “[email protected]” “api.x509labs.com/v1/x509/crl?action=decode&inputEncoding=PEM”
 
Decode a DER encoded X509 crl
curl –fail -F “[email protected]” “api.x509labs.com/v1/x509/crl?action=decode&inputEncoding=DER”
 
Decode an OCSP response
openssl ocsp -noverify -no_nonce -respout ocsp.resp -reqout ocsp.req -issuer ca.cer -cert www.cer -url “http://ocsp2.globalsign.com/gsextendvalg2” -header “HOST” “ocsp2.globalsign.com” -text
curl –fail -F “[email protected]” “api.x509labs.com/v1/x509/ocsp?action=decode&type=response”


So even though this started out as a pet project I actually think these interfaces are pretty useful, the largest limitations of these interfaces are:

X509Certificate

  1. Not every element of the structures is included in the JSON serialization, for example AIA, CDP, Name Constraints and Certificate Policy are not present (most extensions actually); this is because there is not a decoder for them in GO.
  2. ECC based certificates are not supported, this is because at this time the released version of GO doesn’t include support for these.
  3. Only issuing certificates based on self-signed X509 certificates are supported, this is as I mentioned a result of the lack of support for the PKCS #10 object in GO.
  4. No OID is specified for the Signature algorithm, this is because it’s not exposed in GO.
  5. Only one certificate profile is supported when using the issue action, this is mostly due to limitations in go (time was also a factor) for example the lack of AIA and OCSP support mean these regardless of CA key material these certs are just good for playing around.
  6. No user supplied information is included in the generated certificate, this was really just a function of time and building a proper workflow that would not be valuable without addressing other go limitations.
  7. Requested certificates that contain RSA keys must have a bit length of at least 2048 bits in length, just a best practice.
  8. Requested certificates will only be issued if the submitted certificate contains a self-signed certificate with a valid signature, this is to ensure the requestor actually holds the private key.
  9. Not all SAN types are supported, only DNSnames really again a limitation of GO.
  10. Certificates with name constraints are not supported, again a limitation of GO.
  11. Not possible to put EKU in certificates, again a limitation of GO.


X509OCSP

  1. ResponderID is not specified, this is because it’s not exposed in GO.
  2. Only responses with a single response are supported, this is because more that response is not exposed in GO.
  3. No OCSP extensions are supported, this is because this is not exposed in GO.
  4. Only responses are supported, this is because the request is not supported in GO.


Here are some things you might want to know about these interfaces:

  1. Both X509crl and X509ocsp default to DER but you can specify PEM in the encode query string parameter.
  2. X509Certificate defaults to the PEM encoding but DER is supported via the encode query string parameter.
  3. X509Certificates defaults to PEM encoding but DER is not supported.
  4. X509Certificates takes the file you might use in Apache or Nginx to configure which certificates to send — a concatenation of PEM encoded certificates.
  5. All interfaces use HTTP error codes to report issues.
  6. I can’t propose they will always be up and available, be reliable, performant or accurate 🙂

All in-all I think this was a fun project and I really enjoyed working with Eli and Freelancer (though its mail client is awful and the site needs some UI work).

Ryan

How to seed the CryptoAPI URL cache with an OCSP response

It is possible to “staple” an OCSP response into higher level protocols such as TLS. This concept has been supported in Windows since Windows VISTA, shortly after it was added to OpenSSL/Apache and soon it will also be in Nginx.

When “stapling” is used the subscriber (the web server in the TLS case) requests the status of his own certificate from the OCSP responder his CA operates to get a time valid OCSP response for his own certificate.

Since the OCSP response is signed by the CA it can be relayed by the web server for the duration in which that OCSP response is time valid to save the client of the web server (the relying party, aka the browser) the need to make an additional socket connection back to the CA.

This has both performance and privacy benefits.

You can apply the same concept to other PKI related protocols/applications as well, for example in a document signing application like Adobe Acrobat. In such an application the subscriber might sign the document, timestamp it using a timestamp protocol like RFC 3161 and then attach a time valid OCSP response to it so that the document is verifiable at a later date.

This scenario is important not only for its performance and privacy benefits but because it is a practical necessity because CAs do not typically maintain revocation information (OCSP responses and CRLs) for expired certificates.

By stapling the OCSP response to the signed and time-stamped document the relying party can verify the signature, the certificates and the revocation status of the certificates in the context of the timestamp that was attached to the document.

But how do you do that with CryptoAPI?

It’s actually pretty straight forward, as the relying party when you call CertGetCertificateChain to validate the associated certificate you need to:

  1. Once you have verified your timestamp is cryptographically valid and trusted, take the time it and pass it in as pTime.
  2. On the CERT_CONTEXT there is a CERT_INFO structure that contains an array of CERT_EXTENSION, here you create an extension of type CERT_OCSP_RESPONSE_PROP_ID and in there you put a basic signed OCSP response .

When CryptoAPI does the chain validation it will try to use the OCSP response you passed in, if it finds a problem with the provided response it may go online to get a new one that is “OK”.

This online behavior can be controlled by indicating to CertGetCertificateChain you do not want online revocation checking (see CERT_CHAIN_REVOCATION_CHECK_CACHE_ONLY).

Ryan

CryptoAPI, Revocation checking, OCSP and the Unknown certStatus

In CryptoAPI one can use the CertGetCertificateChain API to do the path building and basic chain validation, this validation may include revocation checking depending on which flags you pass via dwFlags; for example these flags control if revocation checking occurs, and if so, on which certificates:

  • CERT_CHAIN_REVOCATION_CHECK_END_CERT
  • CERT_CHAIN_REVOCATION_CHECK_CHAIN
  • CERT_CHAIN_REVOCATION_CHECK_CHAIN_EXCLUDE_ROOT

Typically you would specify CERT_CHAIN_REVOCATION_CHECK_CHAIN_EXCLUDE_ROOT which ensures the whole chain is checked (where possible – e.g. one shouldn’t bother asking the root if he considers himself revoked).

But in the context of OCSP what are the potential revocation related returns we might see?

  1. Revoked – I have received a signed response from the CA or have had policy pushed to me that tells me that this certificate is not to be trusted.
  2. Not Revoked – I have received a signed response from the CA that says this certificate was not revoked.
  3. Unknown – I have received signed response from the CA that says it doesn’t know anything about this certificate.
  4. Offline – I was unable to reach the responder to verify the status of the certificate.

Each of these cases are clearly represented in the API that is used by CertGetCertificateChain to perform the revocation check, this API is CertVerifyRevocation. The higher level CertGetCertificateChain however only has two possible returns: Revoked and Unknown outside the “not revoked” case.

One might assume the OCSP Unknown would get mapped into the Revoked state, this unfortunately is not the case, it is returned as unknown, as does the Offline error.

This means that if OCSP was used you cannot tell what the actual status was, this is especially problematic since IE and Chrome both default to modes where they ignore “Unknown” revocations due to concerns over Revocation responder performance and reliability.

It is possible to work around this platform behavior though — the problem is that it’s not documented anywhere, let’s take a quick stab at doing that here.

First since CertGetCertificateChain doesn’t tell us what method was used to do revocation checking we have to use heuristics to figure it out. Thankfully to enable OCSP stapling in higher level protocols like TLS the OCSP response is passed back to the caller if OCSP was used; to get that we need to know:

1. The CERT_CHAIN_ELEMENT in the returned CHAIN_CONTEXT points to the following revocation information:

  • PCERT_REVOCATION_INFO pRevocationInfo;
  • PCERT_REVOCATION_CRL_INFO   pCrlInfo;
  • PCCRL_CONTEXT           pBaseCrlContext;

2. For an OCSP response, the CRL_CONTEXT is specially created to contain the full OCSP response in the following critical extension szOID_PKIX_OCSP_BASIC_SIGNED_RESPONSE.

  • The presence of this extension indicates an OCSP response was used.
  • The Issuer name in the CRL is the name of the OCSP signer.
  • The signature algorithm is sha1NoSign.
  • ThisUpdate and NextUpdate contain the response validity period.

With this we can take the OCSP response from the CRL_CONTEXT and then look at the “ResponseData” within it, you will need to look within the “responses” here,  you will need to find the right “SingleResponse” based on its “CertID”.

NOTE: Some responders will return the status of multiple certificates in a response even if the status of only one was requested.

You now can determine what the responder said the status of the certificate was by inspecting “certStatus” element.

This is a fair amount of work unfortunately but it does enable you to do the right thing with authoritative “Unknown” responses.

Ryan

How one typically verifies code comes from Microsoft

Microsoft signs all code that ships from it (that is except for the case when it doesn’t); so how does one verify that the code came from them vs. anyone with a fraudulent certificate claiming to be them?

Well the answer is pinning, but the pinning for the most part does not happen at the signing certificate level as those keys change to frequently to be pinned. The pinning happens at the certificate issuer level, much like has been proposed by CAA.

So to understand how this happens in code you need to understand code signing in Windows a little. There are two types of signatures those that are “embedded” and those that are “attached”.

Authenticode would be an example of an embedded signature; Catalog Files on the other hand are detached signatures. There are other examples of both of these but in general these other formats have the same abstract properties.

So when do you use one vs. the other? Well if a user will download your binary directly (ActiveX, Setup, etc.) you would typically embed a signature.

If that’s not the case you would use a detached signature because a single signature can be placed on a list of binaries without increasing the package size (it’s one signature on n hashes). You produce these signatures with SignerSignEx.

For the two signature formats I mentioned you do your signature verifications using an API called WinVerifyTrust. You can also use this API to get information out of a signature (who signed it, when, etc.).

With that information you do a certificate validation that is accomplished with the CertGetCertificateChain API, that gives you a CERT_CHAIN_CONTEXT which you can use to call CertVerifyCertificateChainPolicy.

This API is used to do application specific verifications, for example in the case of TLS the CERT_CHAIN_POLICY_SSL provider is used – this is where the name and EKU verification logic for Windows exists.

The providers we care about for our story today are:

  • CERT_CHAIN_POLICY_AUTHENTICODE – Is this certificate appropriate for code-signing?
  • CERT_CHAIN_POLICY_AUTHENTICODE_TS – Is this certificate appropriate for time stamping code?
  • CERT_CHAIN_POLICY_MICROSOFT_ROOT – Is this certificate ultimately issued by a Microsoft Product Root?

The last one is the one in has an array of hashes in it, I don’t recall if they are key hashes or thumbprints of the certificate. In essence what it does is look at the top of the chain to see if the Root matches one of these hashes if it does it passes, if it doesn’t it fails.

Applications may choose to do additional “pinning” also, for example in the case of Windows Update Services a manifest is exchanged between the client and server, that manifest comes down over SSL they may choose to also do pinning to a set of certificates for the SSL session or apply digital signatures to the manifest and do pinning for the keys that are used to do signing.

I do not know personally for a fact that any such pinning takes place but I have been told by several people I respect that it does.

It looks as if Windows Update was not doing pinning but as of this week it will, this is of course  a best practice and I am glad to see them doing it now.

So now you know how to validate that code is coming from Microsoft, or at least how it’s supposed to work.

Issues like represented in MSRC 2718704 / Flame put some of these assumptions in question, it’s clear that pinning is an important concept though and one that should be supported more broadly.

Ryan

How to clear the CryptNet cache in Windows 7

OK, so this is going to be geeky and I wouldn’t normally post stuff like this to my Facebook page but for various reasons I can’t post to my blog right now and I want to capture this somewhere.

So in Windows there are several services related to the cryptography, certificates and smartcards; services are able to perform actions for the user and system in the background and enable application developers to do things in a least-privileged way.

One of the core services in these scenarios is the “Cryptographic Services” service; it does a bunch of things including the wire retrievals for CryptoAPI.

Specifically it is the worker for CryptRetrieveObjectByUrl which is used by Windows and other applications to gather evidence necessary to validate certificates, such evidence includes intermediate certificates, CRLs, OCSP responses and a file called commonly referred to as the Windows Certificate Trust List.

This API (at least in Windows 7) maintains a single cache for the whole system of the objects it has downloaded.

These files are kept in a hidden system folder called CryptNetUrlCache, in some cases you may want to test a scenario without relying on the cache, to do that you must flush the cache. The easiest way to do that is to open an administrative command prompt and run the following commands:

cd %WINDIR%\ServiceProfiles\LocalService\AppData\LocalLow\Microsoft\CryptNetUrlCache

attrib .\Content\*.* -s

del .\Content\*.*

attrib .\MetaData\*.* -s

del .\MetaData\*.*


%WINDIR%\SysWOW64\config\systemprofile\AppData\LocalLow\Microsoft\CryptnetUrlCache

attrib .\Content\*.* -s

del .\Content\*.*

attrib .\MetaData\*.* -s

del .\MetaData\*.*
%WINDIR%\System32\config\systemprofile\AppData\LocalLow\Microsoft\CryptnetUrlCache

attrib .\Content\*.* -s

del .\Content\*.*

attrib .\MetaData\*.* -s

del .\MetaData\*.*
%WINDIR%\ServiceProfiles\NetworkService\AppData\LocalLow\Microsoft\CryptnetUrlCache

attrib .\Content\*.* -s

del .\Content\*.*

attrib .\MetaData\*.* -s

del .\MetaData\*.*


Alternatively you can call this command:

certutil -URLcache * delete


No reboot is necessary, next time a component calls the CryptRetrieveObjectByUrl API it will not be able to satisfy that request with the cached data and will be forced to go on the wire.

One of the functions the service offers is the Automatic Update of the root store, a way to validate the cache is not being used is to:

  1. Remove all “Trusted Third Party CertificateAuthorities” from the Computer Account’s store using the Certificate Managementconsole.
  2. Clear the cache as described above
  3. Visit https://www.godaddy.com
  4. in IE
  5. Open Even Viewer\Application
  6. Sort on “Event ID”, find the 4097

Since every time a root is added a new event log entry is created you will see something that says “Successful auto update of third-party root certificate” in the event log, you will also see a few files in the above directories you previously cleared.

This all tells you that new wire retrieval took place and that the cache was not used.

You can of course also use tools like Reg/FileMon as well as Network Monitors to infer much of the same.


Hope this helps someone someday,

Ryan

How to tell if a volume is Bitlocker Protected with TPM and PIN

Today I was presented with a question, how can I tell if the OS volume is protected with Bitlocker a TPM and a PIN.

Since I could not sleep (its 2:30AM right now) I figured I would throw together a quick and dirty script that checks for that, it was pretty easy to do.

I started with the documentation for Win32_EncryptableVolume which I recall seeing previously in a unrelated mail at some point, from there I discovered the GetKeyProtectors method, I then did a search on Live for GetKeyProtectors and VBSCRIPT that was scoped to Microsoft.com domains.

This got me a handful of samples, I took one hacked it up and came up with this:

‘ ——————————————————————————–
‘ Get configuration we will need
‘ ——————————————————————————–
‘ Get the OS System Drive
set shell = WScript.CreateObject( “WScript.Shell” )
strDriveLetter = shell.ExpandEnvironmentStrings(“%SystemDrive%”)

‘ Target computer name
‘ Use “.” to connect to the local computer
strComputerName = “.”

‘ ——————————————————————————–
‘ Connect to the BitLocker WMI provider class
‘ ——————————————————————————–

strConnectionStr = “winmgmts:” _
& “{impersonationLevel=impersonate,authenticationLevel=pktPrivacy}!\\” _
& strComputerName _
& “\root\cimv2\Security\MicrosoftVolumeEncryption”
On Error Resume Next ‘handle permission errors

Set objWMIService = GetObject(strConnectionStr)

If Err.Number <> 0 Then
WScript.Echo “Failed to connect to the BitLocker interface (Error 0x” & Hex(Err.Number) & “).”
Wscript.Echo “Ensure that you are running with administrative privileges.”
WScript.Quit -1
End If

On Error GoTo 0

‘ ——————————————————————————–
‘ Get a list of volumes that could be bitlocker protected.
‘ ——————————————————————————–

strQuery = “Select * from Win32_EncryptableVolume where DriveLetter='” & strDriveLetter & “‘”
Set colTargetVolumes = objWMIService.ExecQuery(strQuery)

If colTargetVolumes.Count = 0 Then
WScript.Echo “FAILURE: Unable to find BitLocker-capable drive ” &  strDriveLetter & ” on computer ” & strComputerName & “.”
WScript.Quit -1
End If

‘ there should only be one volume found
For Each objFoundVolume in colTargetVolumes
set objVolume = objFoundVolume
Next

‘ ——————————————————————————–
‘ Now check if it was protected with a TPM and a PIN
‘ ——————————————————————————–

nKeyProtectorTypeIn = 4 ‘ type associated with “TPM and Pin” protector

nRC = objVolume.GetKeyProtectors(nKeyProtectorTypeIn, aKeyProtectorIDs)

If nRC <> 0 Then
WScript.Echo “FAILURE: GetKeyProtectors failed with return code 0x” & Hex(nRC)
WScript.Quit -1
End If

‘ there should only be one volume found
For Each objFoundVolume in colTargetVolumes
set objVolume = objFoundVolume
Next

‘ ——————————————————————————–
‘ Now return what we found.
‘ ——————————————————————————–
On Error Resume Next ‘handle unitialized array

If IsNull(aKeyProtectorIDs(0)) Then
WScript.Echo “This volume is NOT TPM and PIN protected.”
Else
WScript.Echo “This volume IS TPM and PIN protected.”
End If


From the time I decided to write the script, to the time I wrote it and tested it was about 15 to 20 minutes; the samples were great, the MSDN documentation was pretty decent too; all this without ever doing anything with Bitlocker before, WMI is great stuff.

I may never use this but if nothing else it was quick and fun to throw together, maybe it will help you.

How to clear the IE SSL Cache from JS

Just ran accross a good blog post on how to clear IE’s SSL Session Cache, this is useful if you want to have a “logoff” button on a website that uses mutually authenticated SSL.

Specifically a new execCommand was added in to enable this:

// Clear current credentials
// Requires IE6 SP1 or later
document.execCommand(“ClearAuthenticationCache”, false)

Check it out: http://www.adopenstatic.com/cs/blogs/ken/archive/2005/04/12/14.aspx